Hole Sahi Nahi… Toh Anchor Kabhi Strong Nahi Hoga
In the world of construction fastening, anchoring, and structural fixing, there is one truth that every experienced site engineer, contractor, and installation technician knows — but that is consistently overlooked under the pressure of project timelines and cost targets: the strength of any anchor system begins not with the anchor itself, but with the quality of the hole it sits in.
You can specify the most expensive, highest-rated mechanical or chemical anchor available in the market. You can source it from the most reputable manufacturer in the industry. But if the hole drilled to receive that anchor is oversized, off-angle, wrong depth, or poorly finished — that anchor will never achieve its rated load capacity. Ever.
Improper drilling is the single most common and most preventable cause of anchor underperformance and failure on construction sites across Delhi, Mumbai, Dubai, and throughout India and the Middle East. This guide explains exactly what goes wrong during drilling, why it matters so critically for anchor performance, and how to ensure every hole on your site delivers the foundation for a truly strong and reliable fastening connection.
The Real Problem – Improper Drilling Leads Directly to Weak Anchoring
Anchor installation is a two-stage process. Stage one is drilling. Stage two is anchor installation. Most site training, product documentation, and quality attention focuses almost entirely on stage two — the anchor itself. But stage one — the drilled hole — determines the ceiling of performance that the anchor can ever achieve, regardless of its rated specification.
When drilling is done incorrectly, the anchor never gets the chance to perform as designed. The mechanical interlock between anchor and substrate is compromised from the moment the drill bit enters the material. And because the hole is hidden inside the substrate once the anchor is installed, the problem is invisible — right up until the moment the anchor fails under load.
What Goes Wrong During Drilling – Common Drilling Errors on Site
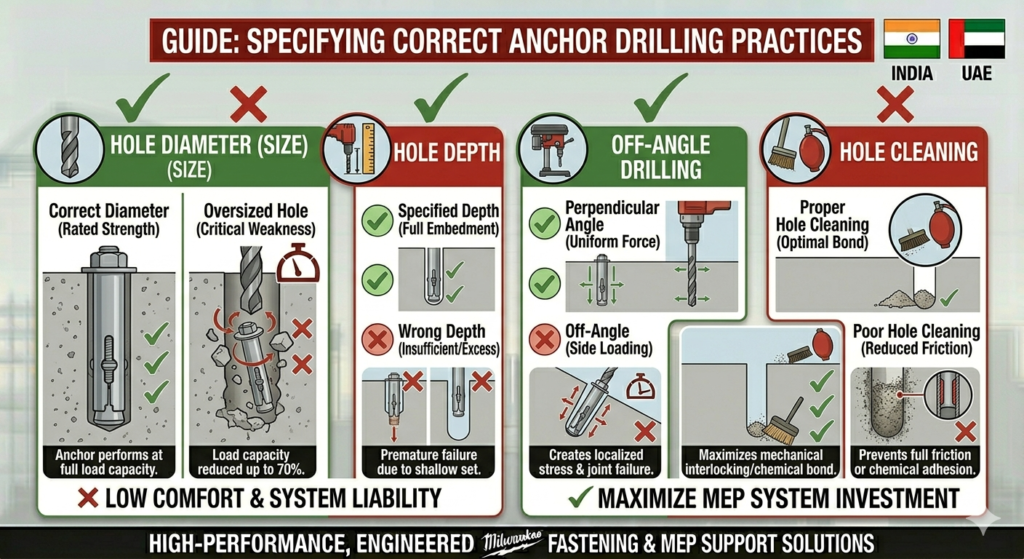
Oversize Hole Diameter
This is the most frequent drilling error encountered on construction sites. When a drill bit is worn, damaged, or incorrectly sized, or when the operator applies excessive lateral pressure during drilling, the resulting hole diameter is larger than the anchor’s specified installation diameter.
The consequences of an oversized hole are severe and immediate. Mechanical expansion anchors rely on precise contact pressure between the expanding sleeve or cone and the hole wall to develop their rated load capacity. In an oversized hole, this contact pressure is dramatically reduced or entirely absent. The anchor sits loosely in the hole, cannot develop full expansion force, and fails at a fraction of its rated load.
For chemical anchors, an oversized hole increases the annular gap between the threaded rod and the hole wall, altering the resin volume ratio and potentially creating voids in the cured adhesive that become stress concentration points under load.
Uneven and Off-Angle Drilling
When a drill operator fails to maintain a perpendicular angle to the substrate surface during drilling, the resulting hole runs off-axis relative to the planned fixing direction. An off-angle hole creates uneven bearing conditions inside the substrate and introduces bending stress into the anchor under axial load — dramatically reducing the effective tensile and shear capacity of the connection.
In reinforced concrete, off-angle drilling also increases the risk of hitting reinforcement bars — causing damage to both the rebar and the drill bit, and creating a compromised hole geometry that cannot be corrected without significant substrate repair.
Incorrect Hole Depth
Every anchor system has a minimum embedment depth specified by the manufacturer based on engineering calculations for the substrate material and rated load. Drilling to insufficient depth means the anchor cannot achieve full embedment, reducing the effective load transfer length and dramatically cutting tensile load capacity.
Drilling too deep wastes time and drill bit life, and in thin concrete elements or slabs can risk breakthrough — compromising the structural integrity of the substrate element itself.
Poor Hole Cleanliness
After drilling in concrete, masonry, or stone, the hole is filled with fine dust, debris, and loose aggregate particles. This drilling debris must be completely removed before anchor installation. For mechanical anchors, debris prevents full expansion contact with the clean hole wall. For chemical anchors, dust contamination between the resin and the hole wall prevents proper adhesive bonding — creating a fundamentally weak connection that will fail progressively under sustained load.
Wrong Drill Bit Type for Substrate
Using a standard twist drill bit for concrete drilling, a masonry bit for steel drilling, or any bit not matched to the substrate material results in poor hole geometry, excessive heat generation, accelerated bit wear, and a hole surface finish incompatible with the anchor type being installed.
Drilling Without Hammer Action in Hard Concrete
Attempting to drill anchor holes in concrete or masonry without activating the hammer function of a rotary hammer drill results in extremely slow progress, excessive heat buildup, rapid bit wear, and a hole with poor surface geometry caused by the bit grinding rather than cleanly impacting and cutting through the aggregate structure.
The Direct Impact of Poor Drilling on Anchor Performance
The consequences of incorrect drilling practice are not theoretical — they are measurable, documented, and consistently observed in anchor pull-out testing on real construction sites:
👉 Dramatically Reduced Load Capacity — An anchor installed in an oversized hole can lose 30 to 70 percent of its rated tensile load capacity compared to the same anchor correctly installed in a properly drilled hole. This means a structure designed to carry a specific load using specified anchors may be carrying that load on connections with less than half the intended strength
👉 Complete Anchor Failure Under Working Load — In the most serious cases of drilling error — severely oversized holes, grossly insufficient embedment depth, or heavily contaminated holes — anchors fail completely under loads well within the intended working load range, creating sudden and dangerous structural failures
👉 Progressive Creep Failure — Chemical anchors in contaminated or oversized holes may appear to hold initially but progressively creep and displace under sustained load over weeks or months, eventually reaching a point of sudden catastrophic failure with no visible warning
👉 Voided Warranty and Certification — All reputable anchor manufacturers specify minimum drilling requirements as conditions of their product load ratings and certifications. Anchors installed in holes that do not meet these drilling specifications are outside the certified performance envelope — voiding all manufacturer warranties and engineering approvals
👉 Liability and Safety Risk — Structural fixings that fail due to improper drilling create serious safety hazards, legal liability for the installing contractor, and potential criminal responsibility in cases involving injury or loss of life
The Correct Drilling Process for Strong and Reliable Anchor Installation
Follow this step-by-step drilling protocol on every anchor installation to ensure full rated performance from every fastener:
Step 1 – Select the Correct Drill Bit Type and Size Always use the drill bit type specified by the anchor manufacturer for the substrate material. Use SDS-Plus or SDS-Max carbide-tipped bits for concrete and masonry anchor holes. Verify the bit diameter matches the anchor’s specified hole diameter exactly — never use a bit that is worn beyond its dimensional tolerance.
Step 2 – Check Drill Bit Condition Before Use Inspect every drill bit before use. A worn carbide tip produces oversized, rough holes that compromise anchor performance. Replace any bit showing signs of tip wear, carbide chipping, shank damage, or body deformation. The cost of a replacement drill bit is always less than the cost of an anchor failure.
Step 3 – Set Correct Drilling Depth Use the depth stop collar on your rotary hammer drill set to the anchor manufacturer’s specified minimum embedment depth plus hole cleaning allowance. Never estimate drilling depth visually — always use the depth stop to ensure consistent and correct hole depth on every installation.
Step 4 – Maintain Perpendicular Drilling Angle Position the drill perpendicular to the substrate surface before starting. Use a drill guide or angle reference where precise alignment is critical. Apply steady, consistent forward pressure — never lateral pressure — throughout the drilling operation to maintain hole straightness.
Step 5 – Use Correct Drilling Mode Always use rotary hammer mode for concrete and masonry drilling. Pure rotation mode for steel and timber drilling. Never use hammer mode when drilling near substrate edges or into thin concrete sections where impact force could cause spalling or cracking.
Step 6 – Clean the Hole Thoroughly Before Anchor Installation This step is non-negotiable and is the most commonly skipped step on busy construction sites. After drilling, clean the hole using compressed air blowing and a hole cleaning brush — minimum three blow and brush cycles for mechanical anchors, and a minimum of four cycles for chemical anchor applications. For chemical anchors in wet or contaminated conditions, follow the manufacturer’s specific hole preparation protocol exactly.
Step 7 – Inspect the Hole Before Installing the Anchor Before inserting any anchor, visually inspect the hole for correct diameter, depth, straightness, and cleanliness. Use a go/no-go gauge for critical structural applications. Never install an anchor in a hole that does not meet specification — it is always faster and cheaper to redrill than to remediate a failed anchor connection.
Choosing the Right Drilling Equipment for Anchor Installation
The quality of your drilling equipment directly determines the quality of every hole on your site. Invest in professional-grade tools for anchor drilling applications:
✔ Professional Rotary Hammer Drills — SDS-Plus for anchor diameters up to M16, SDS-Max for larger diameter anchor holes in hard concrete. Professional grade machines maintain consistent RPM and impact energy under load — ensuring uniform hole geometry throughout the drilling operation
✔ Diamond Core Drilling Equipment — For large diameter anchor holes, holes near reinforcement, or holes in very hard concrete where carbide percussion drilling produces oversized or damaged holes, diamond core drilling produces clean, accurate, dimensionally precise holes with smooth walls ideal for chemical anchor installation
✔ Calibrated Depth Stop Collars — Every rotary hammer drill used for anchor installation should have a properly set and verified depth stop collar. Verify depth stop setting against a reference gauge at the start of each working day
✔ Quality Carbide Drill Bits — Specify professional-grade carbide-tipped SDS bits from reputable manufacturers. Cheap drill bits wear rapidly, produce oversized holes, and cost far more in wasted time, replacement anchors, and remedial work than the saving on bit purchase price
✔ Hole Cleaning Equipment — Compressed air blow-out bulbs, hole cleaning brushes in matching diameters, and for critical chemical anchor applications, proper pump-action blow-out tools that generate sufficient air velocity to remove fine dust from the full hole depth
Why Drilling Quality Matters Even More for Chemical Anchors
While correct drilling is critical for all anchor types, it is absolutely paramount for chemical adhesive anchor systems. Chemical anchors develop their load capacity entirely through the bond between the cured resin and the hole wall surface. Any factor that compromises this bond surface — oversized hole, dust contamination, moisture, oil, or poor hole geometry — directly and proportionally reduces the anchor’s bonded strength.
Chemical anchor manufacturers publish minimum hole cleaning requirements as mandatory installation conditions, not optional recommendations. Failure to meet these requirements invalidates all published load data and engineering approvals for the anchor system.
For critical structural chemical anchor applications — facade brackets, overhead fixings, cantilever supports, seismic zone installations — independent pull-out testing of installed anchors is strongly recommended to verify that drilling and installation quality has achieved the required load performance on the actual site substrate.
Educational Insight – The True Cost of Poor Drilling on Your Project
The financial impact of poor drilling practice extends far beyond the cost of a failed anchor:
Anchor replacement in a completed installation requires careful extraction of the failed fastener, assessment of substrate damage around the failed hole, redrilling in a new location or substrate repair before redrilling in the same location, reinstallation of replacement anchor, and reinstatement of any finished surfaces disturbed during remediation.
In facade, cladding, and structural applications, anchor failure remediation typically costs 15 to 30 times the original installation cost per anchor point — before accounting for any consequential damage to connected materials, finishes, or building systems.
The investment in proper drilling equipment, quality drill bits, trained operators, and consistent hole preparation protocol is the single highest-return quality investment available on any construction fastening project.
Final Advice for Site Engineers, Contractors, and Fastening Specialists
Drilling is not a preliminary task that happens before the real work of anchor installation begins. Drilling IS the foundation of anchor installation. The hole quality you achieve at the drill sets the absolute ceiling of anchor performance that is possible — no matter how good the anchor product is, no matter how carefully it is installed.
Train your installation teams on correct drilling technique. Invest in professional quality rotary hammer drills and carbide drill bits. Implement a hole inspection and cleaning protocol on every site. And never allow time or cost pressure to compromise the quality of the most fundamental step in your fastening system.
Strong anchoring starts with a strong hole. And a strong hole starts with the right equipment, the right technique, and the right discipline on every single installation.
📞 Call us before finalizing your drilling tools and anchor systems — get free expert technical guidance on correct hole preparation for your specific substrate, anchor type, and application 📲 WhatsApp us the word “ANCHOR” to receive drilling equipment recommendations, anchor selection guidance, and complete fastening solutions tailored to your project requirements 🎯 Get free fastener and drilling tool selection support from our technical team — helping contractors, site engineers, and construction professionals across India and the Middle East achieve correct anchor installation from the very first hole
Supplying professional rotary hammer drills, SDS drill bits, diamond core drilling equipment, mechanical anchors, chemical anchors, and complete fastening hardware across Delhi, Noida, Gurgaon, Faridabad, Ghaziabad, Mumbai, Bangalore, Chennai, Hyderabad, Pune, Assam, Guwahati, Gujarat, Dubai, Abu Dhabi, Sharjah, UAE, and all major cities across India and the Middle East.